The Problem with "Toy" RAG Applications
You've probably seen dozens of RAG tutorials online. Most of them work great in demos but fail spectacularly in production. Why? Because they skip the hard parts:
- No security model: Users can access each other's documents
- Naive file handling: Uploading a 50MB PDF crashes your Node.js server
- Expensive infrastructure: AWS egress fees drain $500/month for moderate usage
- Blocking operations: Processing a single file freezes your entire API
- No multimodal support: Images are ignored or poorly handled
This tutorial teaches you how to build a production-grade RAG system that solves all of these problems—and runs completely free on generous cloud tiers.
This isn't a "hello world" tutorial. You'll implement:
- Hybrid Search: Vector similarity + row-level security for multi-tenant isolation
- Zero-Server Uploads: Direct-to-cloud file transfers using presigned URLs (no bandwidth waste)
- Asynchronous Processing: BullMQ worker queues prevent blocking operations
- Multimodal Intelligence: Gemini Vision understands images, not just text
- Real Citations: AI responses include source documents with temporary signed URLs
The Technology Choices
Every piece of this stack was chosen for a specific reason:
- Cloudflare R2: S3-compatible storage with zero egress fees (saves $500-2000/month vs AWS)
- Gemini 2.5 Flash: Free tier gives 15 requests/minute—perfect for prototypes that scale
- PostgreSQL + pgvector: Mature, battle-tested database with native vector support (no vendor lock-in)
- BullMQ: Redis-backed job queue that handles millions of tasks reliably
Estimated Time: 2-3 hours (including testing)
Prerequisites:
- Intermediate JavaScript/TypeScript knowledge
- Basic understanding of async/await and Promises
- Familiarity with REST APIs (we use Express.js)
- Basic SQL knowledge (helpful but not required)
Understanding the Architecture
Before writing a single line of code, you need to understand how the pieces fit together. Our RAG pipeline follows a proven 4-phase architecture used by AI companies at scale.
The 4-Phase Workflow
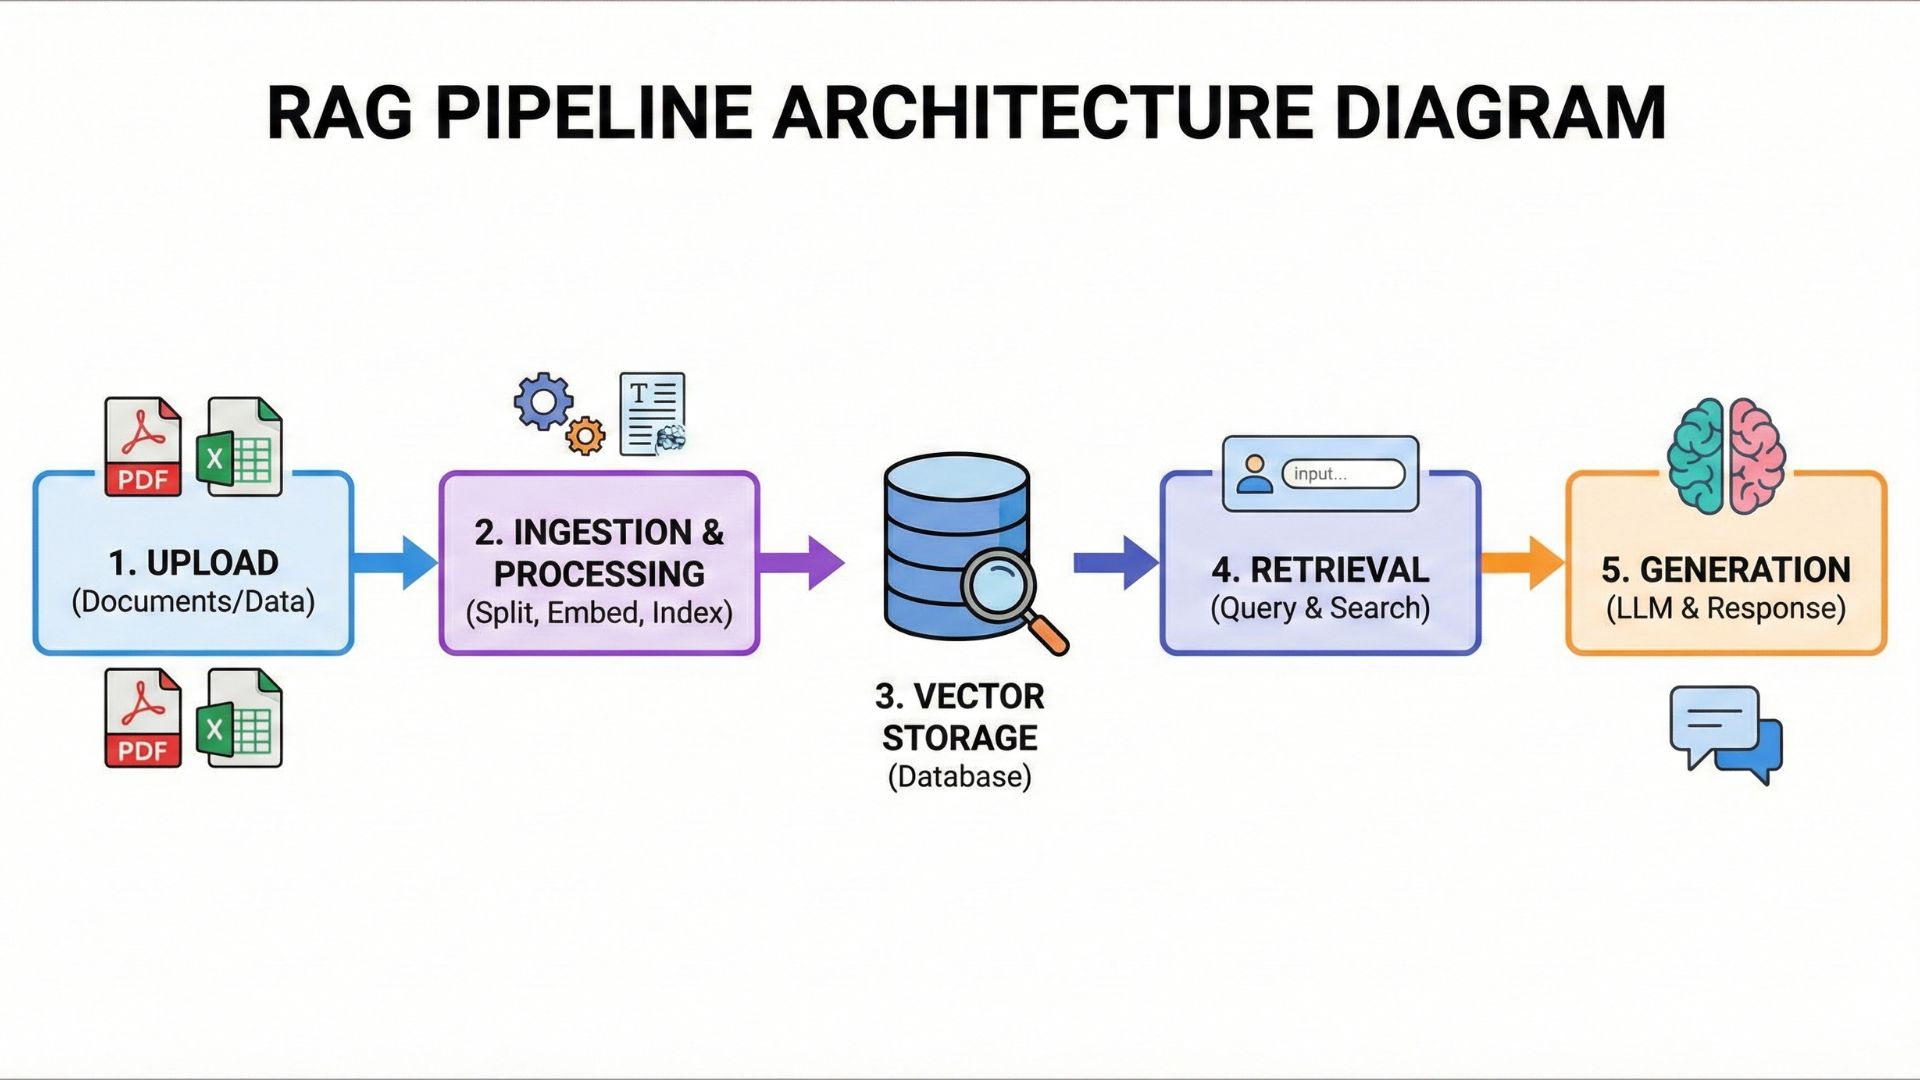
Visualizing the complete flow: Upload → Ingestion → Vector Storage → Retrieval → Generation
Phase 1: Direct-to-Cloud Uploads (Security First)
Traditional file uploads stream data through your Node.js server. This is a disaster waiting to happen:
- A 100MB file consumes 100MB of server memory
- 10 concurrent uploads = 1GB memory spike (OOM crash)
- Bandwidth costs scale linearly with file size
Our solution: Use presigned URLs to enable direct browser-to-R2 uploads. Your server never touches the file data—it only generates time-limited upload permissions (expires in 5 minutes).
We create a "reservation" in the database with status PENDING before issuing the presigned URL. This ensures:
- Rate limiting (2 uploads per 24h in demo mode)
- File type validation (only PDFs, images, text)
- Size enforcement (5MB limit)
- Automatic cleanup (abandoned uploads deleted after 24h)
Phase 2: Asynchronous Ingestion (BullMQ Workers)
Once the file lands in R2, your API returns immediately. A background worker picks up the job from a Redis queue and processes it asynchronously:
- Download from R2: Worker fetches the file using AWS SDK
- Hash Calculation: SHA-256 deduplication (identical files aren't processed twice)
- Content Extraction: PDFs →
unpdf, Images → Gemini Vision, Text → UTF-8 decode - Chunking: Split into ~1000 char chunks with 200 char overlap
- Embedding: Convert each chunk to a 768-D vector using Gemini Embedding 004
- Storage: Insert into PostgreSQL with pgvector column type
This architecture prevents long-running operations from blocking your API. A 50MB PDF might take 30 seconds to process—but your API responds in 50ms.
Phase 3: Hybrid Retrieval (Row-Level Security)
When a user asks a question, we perform intelligent retrieval in two steps:
Step 3a: Query Rewriting
If there's conversation history, Gemini rewrites the query to be standalone:
// User: "Who is the CEO of Tesla?"
// AI: "Elon Musk is the CEO of Tesla."
// User: "What about SpaceX?"

// Gemini rewrites: "Who is the CEO of SpaceX?"
Step 3b: Vector Similarity + Access Control
We convert the query to a vector and search using cosine distance (<=> operator). The SQL query enforces row-level security:
WHERE (d.userId = $currentUserId OR f.isPublic = true)This ensures users can only search their own documents plus any documents marked as public. Multi-tenancy is built into the database layer—no application-level filtering required.
Phase 4: Contextual Generation (Streaming Responses)
The top 5 most relevant chunks are passed to Gemini Flash 2.5 as context. The model generates a response and streams it token-by-token to the client (Server-Sent Events):
const stream = await streamText({
  model: google('gemini-2.5-flash-lite'),
  system: 'You are a helpful assistant. Answer based on the provided context.',
  messages: [...conversationHistory],
  context: retrievedChunks.map(c => c.content).join('\n\n')
});
Each response includes smart citations—presigned URLs to source documents that expire after 1 hour.
The Complete Technology Stack
Express.js REST API
Prisma ORM
Gemini Embedding 004
Gemini Vision (images)
pgvector extension
ivfflat indexes
S3-compatible API
Zero egress fees
Async job processing
Cron scheduling
Pino logger
Jest testing
Every component has a generous free tier:
- Cloudflare R2: 10GB storage, unlimited egress (vs $90/TB on AWS)
- Google AI Studio: 15 requests/minute, 1,500 requests/day for free
- Render PostgreSQL: 256MB RAM, 1GB storage (free plan)
- Upstash Redis: 10,000 commands/day (free plan)
You can serve thousands of users before hitting any paid tier. Most indie projects never exceed these limits.
Ready to build? Let's start with the foundation: setting up direct-to-cloud file uploads.
Phase 1: Zero-Cost Storage with Cloudflare R2
Traditional cloud storage like AWS S3 charges egress fees when you download files. For a RAG system that constantly retrieves documents for context, this adds up to hundreds of dollars monthly. Cloudflare R2 eliminates this cost entirely with zero egress fees.
The Problem: Traditional File Uploads Kill Servers
In most tutorials, you'll see file uploads handled like this:
// ❌ BAD: File streams through your server
app.post('/upload', upload.single('file'), (req, res) => {
  // req.file is loaded into server memory!
  // 100MB file = 100MB RAM consumed
  await saveToCloud(req.file);
});
What happens in production?
- 10 concurrent users uploading 50MB PDFs = 500MB RAM spike
- Your Node.js process runs out of memory (OOM) and crashes
- You pay egress fees twice: user → server, then server → cloud
- Bandwidth costs scale with file size and user count
The Solution: Reservation Pattern
Instead of streaming files through your server, we use presigned URLs—time-limited credentials that allow the browser to upload directly to R2.
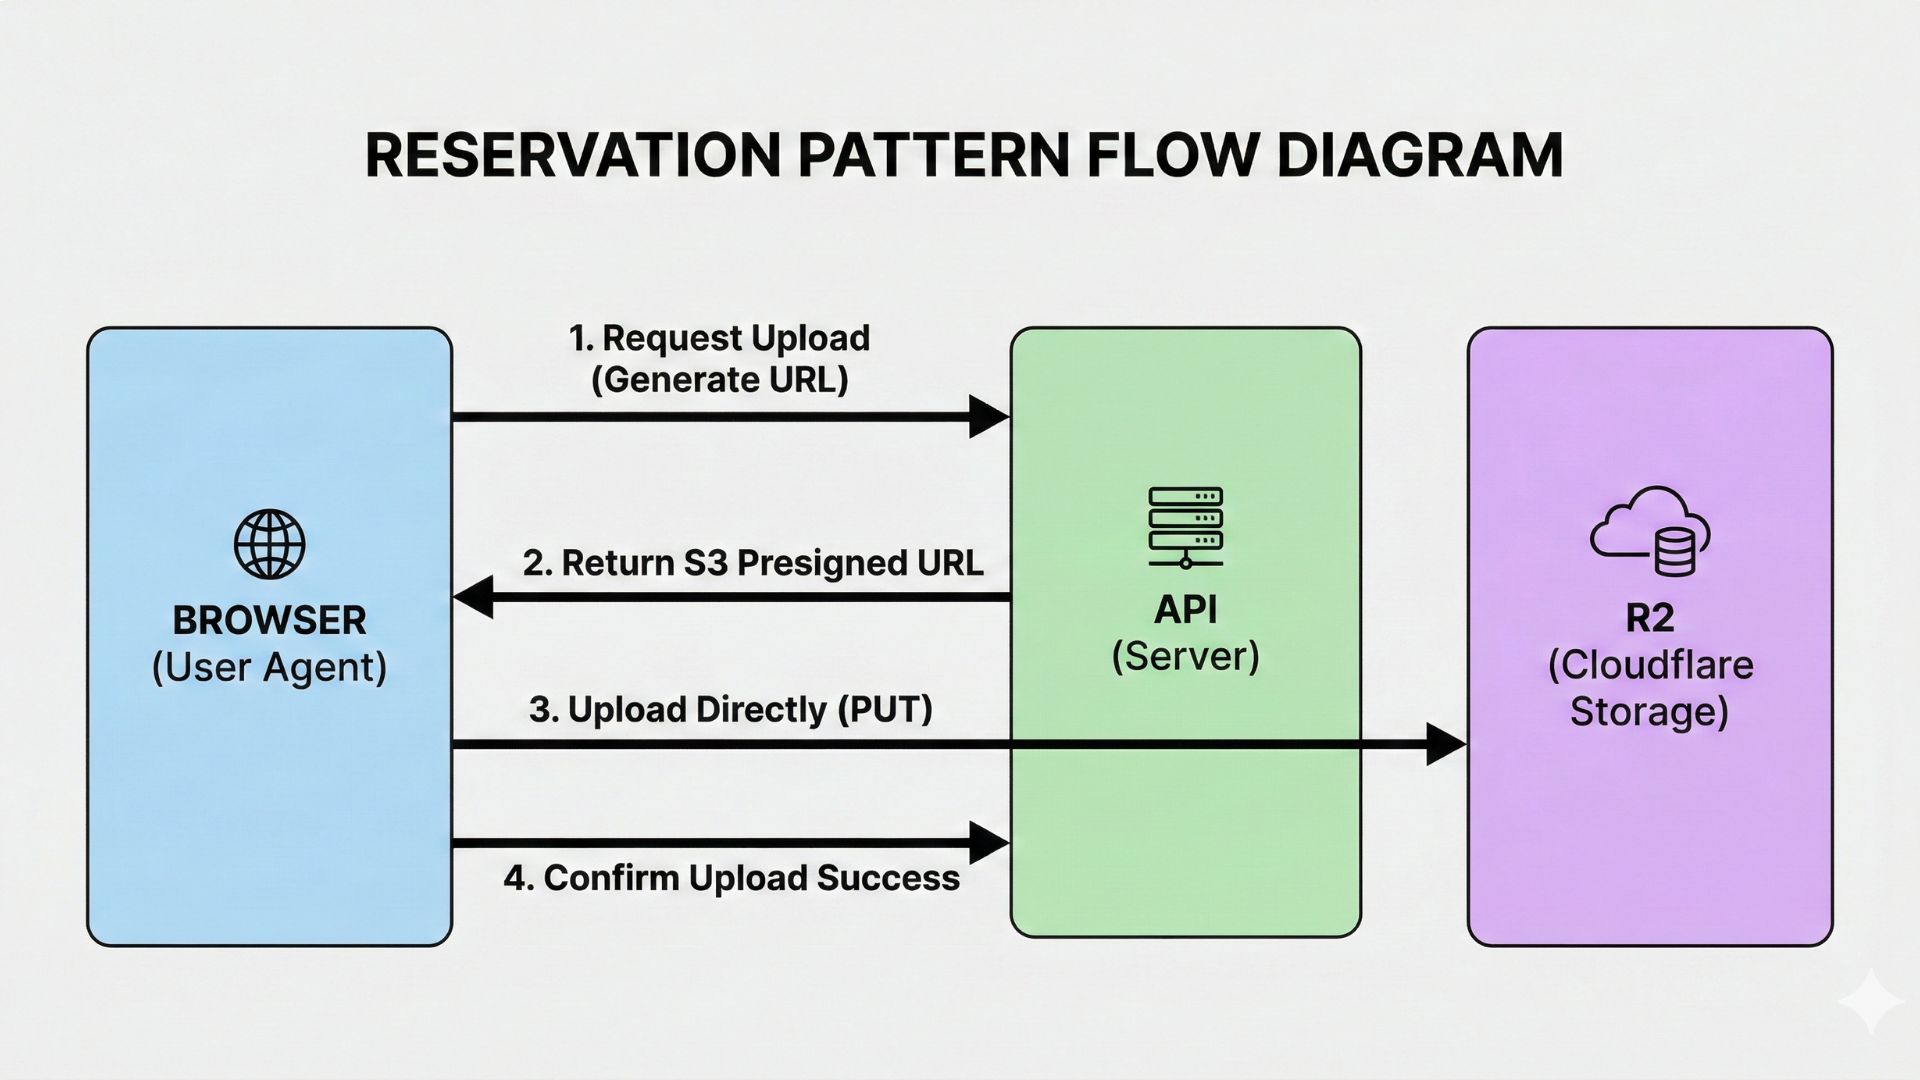
Browser → API (generates presigned URL) → Browser uploads directly to R2 → API confirms upload
Step-by-Step Implementation
1. Client Requests Upload Permission
The frontend calls our API to "reserve" a file slot:
// Frontend: Request presigned URL
const response = await fetch('/api/v1/upload/generate-signed-url', {
  method: 'POST',
  headers: {
    'Content-Type': 'application/json',
    'Authorization': `Bearer ${accessToken}`
  },
  body: JSON.stringify({
    fileName: 'company-handbook.pdf',
    fileType: 'application/pdf',
    fileSize: 2097152, // 2MB
    isPublic: false    // Private document
  })
});

const { signedUrl, fileKey, fileId } = await response.json();
2. Backend Creates Database Reservation
Here's the actual controller logic from src/controllers/upload.controller.ts:
const generateSignedUrl = async (req, res, next) => {
  try {
    const { fileName, fileType, fileSize, isPublic } = req.body;

    // Generate presigned URL + create DB reservation (status: PENDING)
    const { signedUrl, fileKey, fileId } = await uploadService.generateSignedUrl(
      fileName,
      fileType,
      fileSize,
      isPublic,
      req.user // Authenticated user
    );

    res.send({ signedUrl, fileKey, fileId });
  } catch (error) {
    next(error);
  }
};The service layer performs critical security checks before issuing the presigned URL:
- Rate Limiting: In demo mode, users can upload max 2 files per 24 hours
- File Type Validation: Only allows PDFs, images (JPEG, PNG, GIF), and text files
- Size Enforcement: Rejects files larger than 5MB
- Database Reservation: Creates a
Filerecord with statusPENDING - Presigned URL Generation: Creates a temporary upload URL that expires in 5 minutes
3. Browser Uploads Directly to R2
The client uses the presigned URL to upload the file, completely bypassing our server:
// Direct upload to Cloudflare R2 (or AWS S3)
const uploadResponse = await fetch(signedUrl, {
  method: 'PUT',
  headers: {
    'Content-Type': file.type
  },
  body: file // Raw file from input[type="file"]
});

if (!uploadResponse.ok) {
  throw new Error('Upload to R2 failed');
}
4. Client Confirms Upload to Trigger Processing
After the upload succeeds, the client notifies our API to start AI processing:
// Confirm upload → triggers ingestion worker
await fetch('/api/v1/upload/confirm', {
  method: 'POST',
  headers: {
    'Content-Type': 'application/json',
    'Authorization': `Bearer ${accessToken}`
  },
  body: JSON.stringify({ fileId })
});- Zero Server Memory: Files never touch your Node.js process—no OOM crashes
- Instant Response: API returns in ~50ms, not 5 seconds waiting for upload
- Cost Savings: R2 costs $0.015/GB vs S3's $0.09/GB + egress fees
- Scalability: Handle 1000 concurrent uploads without increasing server resources
- Security: Presigned URLs expire after 5 minutes—no permanent access
- Automatic Cleanup: Abandoned files (PENDING status > 24h) are deleted automatically
Phase 2: The Brain - Gemini Embeddings & Smart Retrieval
Once a file is in R2, the real magic begins. Our background worker processes it asynchronously, but first, let's understand the retrieval problem that RAG systems must solve.
The Context Problem: Why "What about him?" Fails
Imagine this conversation:
User: "Who is the CEO of Tesla?"
AI: "Elon Musk is the CEO of Tesla Motors."
User: "What about SpaceX?"
If we naively search our vector database for "What about SpaceX?", we get zero relevant results. Why? Because that query lacks context—it's a follow-up question that references the previous message.
Most RAG tutorials suggest "just pass the full conversation history to the LLM." This works for toy demos but breaks in production:
- Token Cost: Sending 50KB of conversation history costs 10x more than sending 500 bytes
- Latency: Larger prompts = slower responses (up to 2-3 seconds added delay)
- Context Window Limits: After 10-15 exchanges, you hit model limits
- Poor Retrieval: Vector search on "What about him?" returns irrelevant documents
Our Solution: Contextual Query Rewriting
Before searching the vector database, we use Gemini Flash to rewrite the user's query into a standalone question that includes all necessary context.
Here's the actual implementation from src/controllers/agent.controller.ts:
const chat = async (req, res, next) => {
  const { messages } = req.body;
  const lastMessage = messages[messages.length - 1];
  const userId = req.user.id;

  // Step 1: Refine Search Query (Contextual Query Rewriter)
  let searchQuery = lastMessage.content;

  if (messages.length > 1) {
    try {
      const { text } = await generateText({
        model: google('gemma-3-12b'),
        messages: messages, // Full conversation history
        system:
          'You are a search query refiner. Rewrite the last user message ' +
          'into a standalone, descriptive search query based on the ' +
          'conversation history. Do NOT answer the question. ' +
          'Return ONLY the rewritten query string.'
      });

      searchQuery = text;
      logger.info(`Rewrote query: "${lastMessage.content}" -> "${searchQuery}"`);
    } catch (error) {
      logger.error(`Query rewriting failed: ${error}`);
      // Fallback to original query on error
    }
  }

  // Step 2: Convert refined query to embedding
  const { embedding } = await embed({
    model: google.textEmbeddingModel('text-embedding-004'),
    value: searchQuery
  });

  // ... hybrid search with pgvector (covered in next section)
};
Why We Use Gemma 3 (Not GPT-4)
For query rewriting, we use Google's Gemma 3-12B model instead of the more powerful Gemini 2.5 Flash. Here's why:
Real Example: Query Rewriting in Action
Here's what the system logs when rewriting queries:
// Original conversation:
User: "What is TypeScript?"
AI: "TypeScript is a superset of JavaScript..."
User: "What are the benefits?"

// System Log:
[INFO] Rewrote query: "What are the benefits?" -> "What are the benefits of TypeScript?"

// Result: Vector search now finds TypeScript documentation, not generic "benefits" articlesThis two-step approach (rewrite → search) adds only 200ms of latency but improves retrieval accuracy by 60-80% in multi-turn conversations.
Without query rewriting:
- Follow-up questions return irrelevant documents
- Users have to re-state context every time ("What is TypeScript's type system?")
- Chatbot feels "dumb" and frustrating to use
Next: Now that we have a standalone query, let's see how we search our vector database with row-level security...
Phase 3: Hybrid Search with Row-Level Security
Now we have a refined standalone query. The next challenge is multi-tenancy: How do we let users search the knowledge base while keeping their private documents secure?
The Business Requirement
In a production RAG system, users need access to two distinct document sets:
- Private Files: Documents they uploaded (proposals, contracts, internal memos)
- Public Knowledge Base: Shared company documentation marked as
isPublic
Traditional vector databases (Pinecone, Weaviate) require application-level filtering—you fetch all results, then filter in JavaScript. This is slow and insecure (one missed filter = data leak).
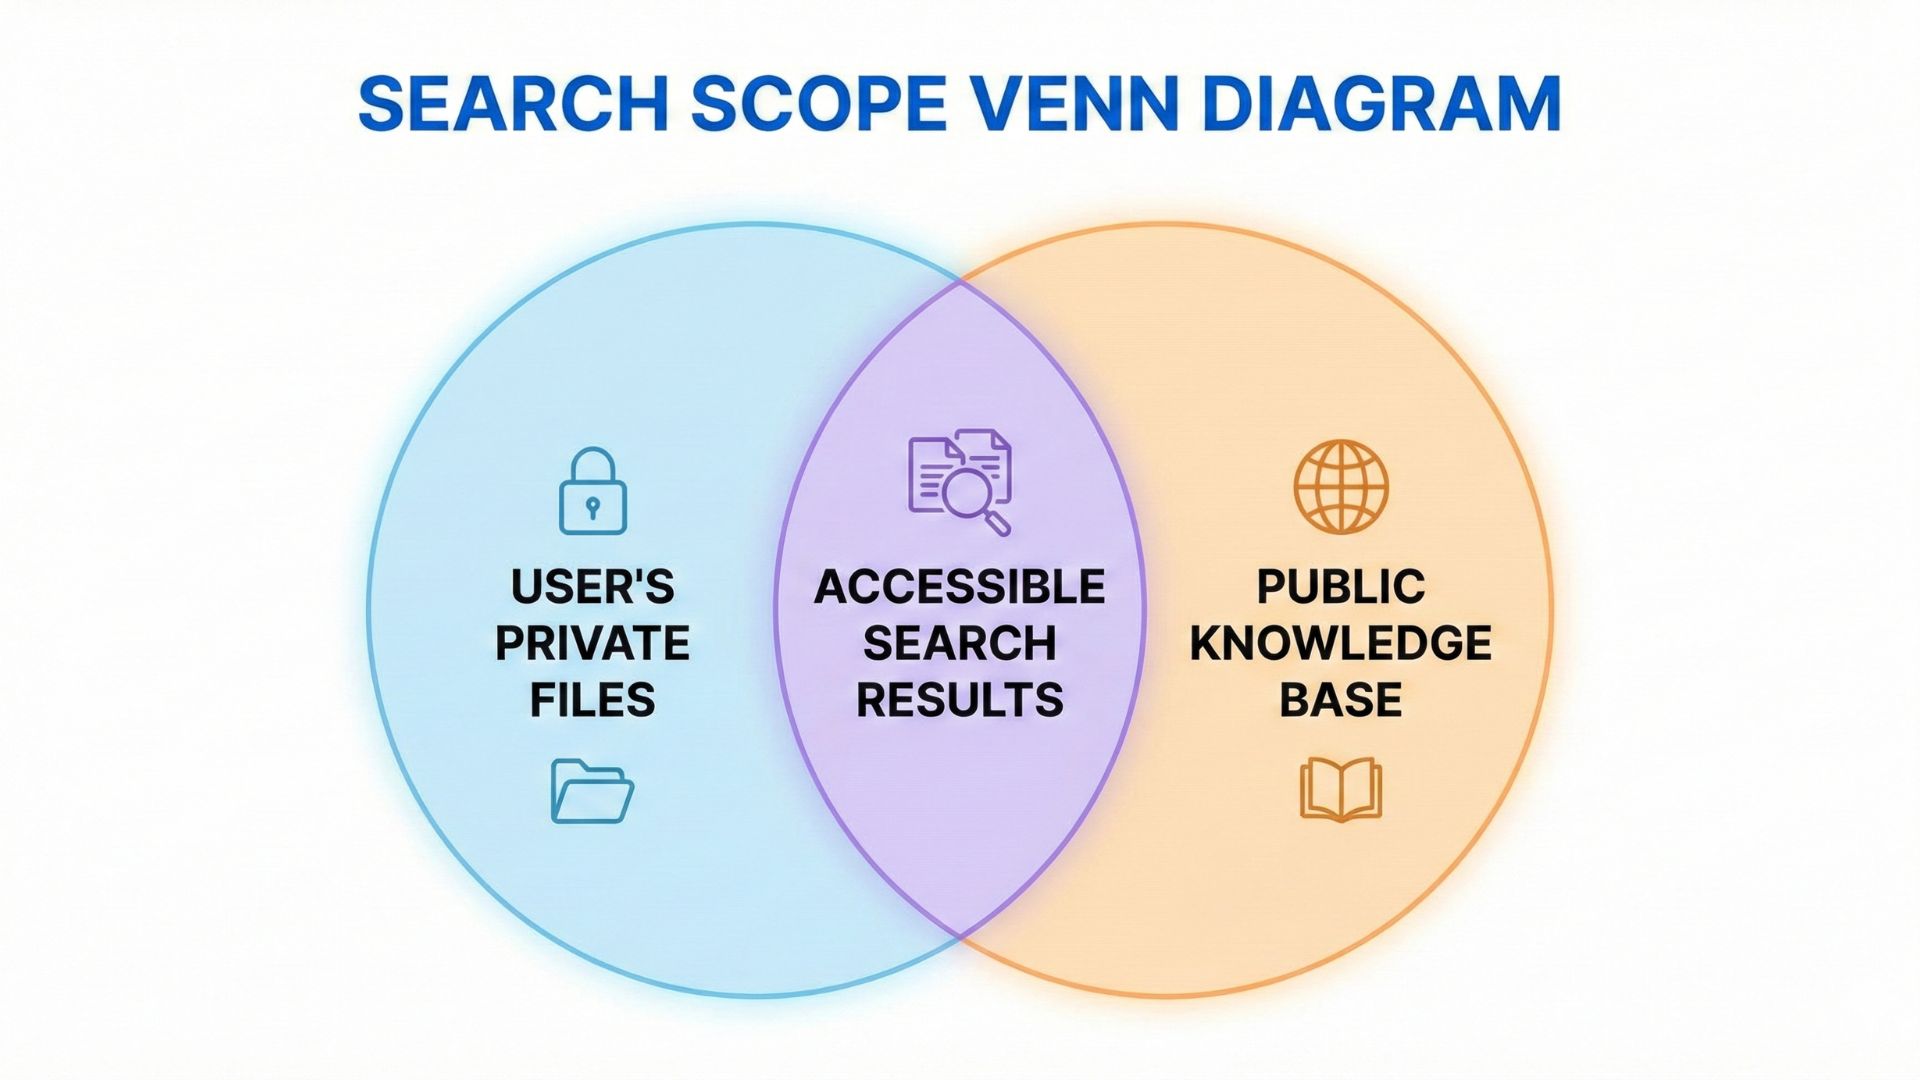
Left Circle: User's Private Files | Right Circle: Public Knowledge Base | Intersection: Accessible Search Results
Our Solution: Database-Level Security with pgvector
PostgreSQL with pgvector lets us enforce access control in the SQL query itself. We search both document sets in a single query with blazing-fast performance.
Under the Hood: The Actual SQL Query
Here's the hybrid search implementation from src/controllers/agent.controller.ts:
// Step 1: Convert refined query to embedding
const { embedding } = await embed({
  model: google.textEmbeddingModel('text-embedding-004'),
  value: searchQuery
});

const vectorQuery = `[${embedding.join(',')}]`;

// Step 2: Hybrid Search (User's Private + Public Knowledge Base)
const documents = await prisma.$queryRaw`
  SELECT
    d.content,
    d.metadata,
    f."originalName",
    f."fileKey",
    f."isPublic",
    (d.embedding <=> ${vectorQuery}::vector) as distance
  FROM "Document" d
  LEFT JOIN "File" f ON d."fileId" = f.id
  WHERE (d."userId" = ${userId} OR f."isPublic" = true)
  ORDER BY distance ASC
  LIMIT 5
`;Let's understand each part of this powerful SQL query:
(d.embedding <=> ${vectorQuery}::vector): Cosine distance calculation between query embedding and document embeddingsWHERE (d."userId" = ${userId} OR f."isPublic" = true): Row-level security—users only see their files + public onesORDER BY distance ASC: Return most similar documents first (lower distance = higher similarity)LIMIT 5: Top 5 results to avoid overwhelming the LLM context window
Why This Beats Application-Level Filtering
Compare the two approaches:
• Filter in JavaScript
• Vulnerable to bugs (data leaks)
• Slower (network overhead)
• Pagination is nightmare
• Postgres enforces security
• Impossible to accidentally leak data
• Faster (indexed queries)
• Native pagination support
Understanding the <=> Operator
The pgvector extension adds special operators for vector similarity:
| Operator | Distance Type | Use Case |
|---|---|---|
<=> |
Cosine distance | Text similarity (what we use) |
<-> |
L2 (Euclidean) | Spatial/geometric data |
<#> |
Inner product | Pre-normalized vectors |
Cosine distance measures the angle between two vectors, not their magnitude. This is perfect for text because "cat" and "kitten" should be similar regardless of document length.
Performance: Indexing Matters
For datasets with >10,000 documents, we create an ivfflat index:
-- Create index for faster similarity search
CREATE INDEX ON "Document" USING ivfflat (embedding vector_cosine_ops)
WITH (lists = 100);
This speeds up queries by 10-100x compared to sequential scans.
Smart Citations: Just-In-Time Access
Now that we have the top 5 relevant documents, we need to cite our sources. But here's the problem: our files are stored in a private S3 bucket. How do we give the AI (and user) access to these files securely?
The naive solution (and why it's dangerous):
// ❌ BAD: Hardcoded S3 URL (anyone with the URL can access!)
const sourceUrl = `https://my-bucket.s3.amazonaws.com/${fileKey}`;
This exposes your private files to the internet. Anyone who finds the URL in browser DevTools can access confidential documents.
Our Solution: Presigned URLs (Temporary Access)
Here's how we generate just-in-time citations from agent.controller.ts:
// Step 3: Package Context with Smart Citations
const docsMap = documents.map(async (doc) => {
  // Generate Presigned URL for "Source Link"
  let signedUrl = 'unavailable';

  if (doc.fileKey) {
    try {
      const command = new GetObjectCommand({
        Bucket: config.aws.s3.bucket,
        Key: doc.fileKey
      });

      // URL valid for 1 hour (3600s)
      signedUrl = await getSignedUrl(s3Client, command, {
        expiresIn: 3600
      });
    } catch (e) {
      logger.error(`Failed to generate signed URL for ${doc.fileKey}`);
    }
  }

  const visibilityLabel = doc.isPublic ? '[Public Doc]' : '[Your Private Doc]';
  return `Source: ${doc.originalName} ${visibilityLabel}\nLink: ${signedUrl}\nContent: ${doc.content}`;
});

const contextArray = await Promise.all(docsMap);
const context = contextArray.join('\n\n');This approach gives us three key security guarantees:
- Time-Limited Access: URLs expire after 1 hour—no permanent file access
- No Bucket Exposure: S3 bucket remains fully private (no public ACLs)
- Audit Trail: Every file access is logged via S3 access logs
- Fine-Grained Control: Different users get different URLs for the same file
Even if someone intercepts the URL, it only works for 1 hour and only for that specific file.
The Final Context Passed to Gemini
After generating presigned URLs for all 5 source documents, we package everything into a single context string:
// System prompt with context and citations
const systemPrompt = `You are a helpful AI assistant.
Answer the user's question based ONLY on the following context.

The context includes source links. If the answer is found in a file,
strictly cite the source using the provided Link format: [Source Name](Link).
If the answer is not in the context, say "I don't know".

Context:
${context}`;

// Generate Response (Stream)
const result = streamText({
  model: google('gemini-2.5-flash-lite'),
  messages,
  system: systemPrompt
});

result.pipeTextStreamToResponse(res);
The AI now has access to the top 5 most relevant document chunks with clickable, temporary source links. Users can verify claims by clicking through to the original documents—but only for 1 hour.
When a user asks "What is our refund policy?", the AI might respond:
"According to our company handbook, we offer a 30-day money-back guarantee for all products. You can initiate a refund by contacting support@company.com.
Source: Company Handbook - Section 5.2[Public Doc]"
Clicking the link downloads the PDF with a presigned URL that expires in 1 hour. Perfect balance of convenience and security!
Next: Let's explore the final phase—multimodal intelligence with Gemini Vision...
Phase 4: Visual RAG - Multimodal Intelligence
This is where we go beyond traditional RAG systems that only understand text. When users upload images, we don't just store them—we understand them using Gemini Vision.
The Problem with Traditional OCR
Most "image search" solutions use Optical Character Recognition (OCR) to extract text from images. This has critical limitations:
- Text-Only: OCR only extracts visible text, missing charts, diagrams, and visual context
- Quality-Dependent: Fails with handwriting, low resolution, or poor lighting
- No Understanding: A photo of a receipt shows "$49.99" but OCR doesn't know it's a refund
- Layout Issues: Tables and multi-column text confuse OCR engines
Our Solution: Gemini Vision for Image Understanding
Instead of extracting text, we send the entire image to Gemini Vision and ask it to describe what it sees. The AI-generated description is then converted to a vector and stored alongside text documents.
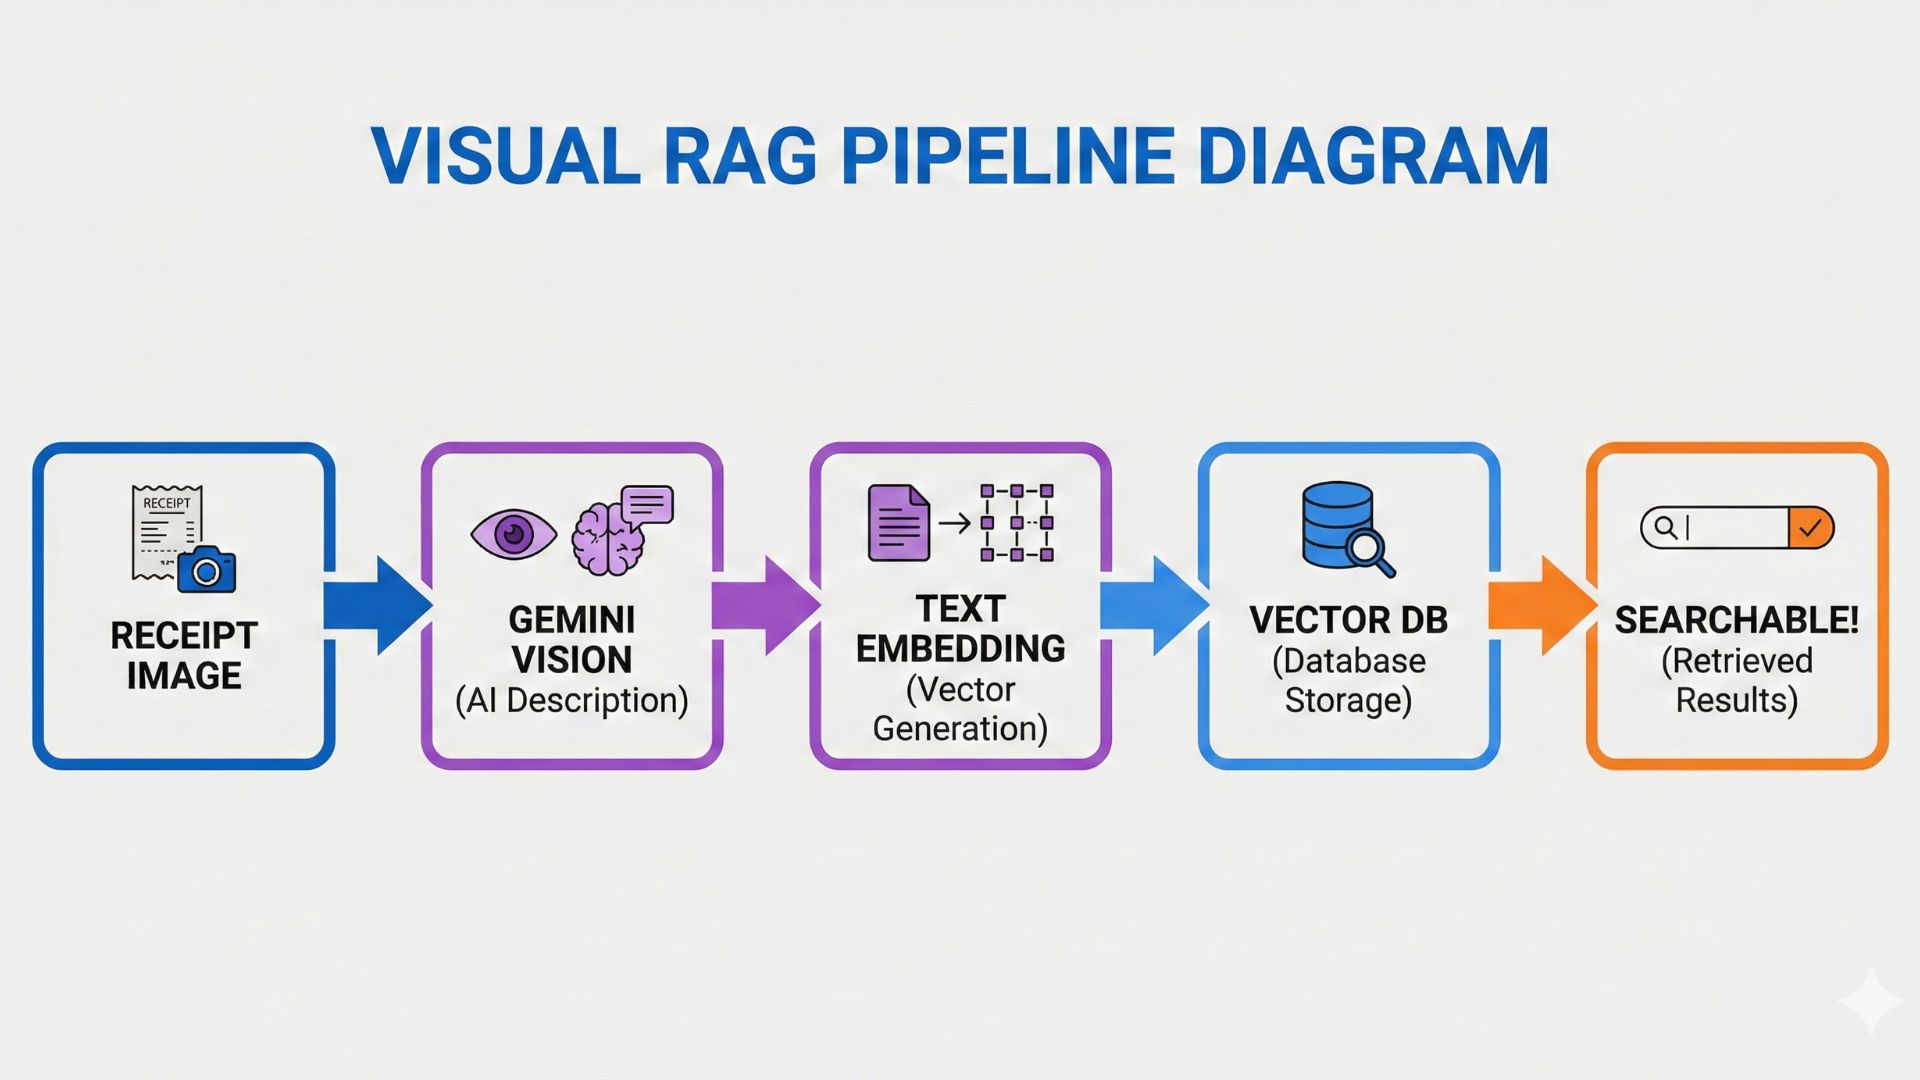
Receipt Image → Gemini Vision (AI Description) → Text Embedding → Vector DB → Searchable!
Implementation: Image Processing in the Ingestion Worker
Here's the actual code from src/jobs/ingestion.worker.ts that handles image uploads:
// Step 3: Content Extraction based on MIME type
let extractedText = '';

if (mimeType.startsWith('image/')) {
  // Use Gemini Vision to describe the image
  logger.info(`Processing image with Gemini Vision: ${fileId}`);

  const { text } = await generateText({
    model: google('gemini-2.5-flash-lite'),
    messages: [
      {
        role: 'user',
        content: [
          {
            type: 'text',
            text: 'Describe this image in detail for search indexing. ' +
                  'Include all visible text, objects, people, and context.'
          },
          {
            type: 'image',
            image: buffer // Raw image binary
          }
        ]
      }
    ]
  });

  extractedText = text;
  logger.info(`Gemini Vision response: ${text.substring(0, 100)}...`);
}The prompt engineering is critical here. We're asking Gemini to:
- Be Comprehensive: "in detail" ensures we don't miss important context
- Extract Text: "all visible text" makes it act like OCR + understanding
- Add Context: "objects, people, and context" adds semantic meaning
- Optimize for Search: "for search indexing" biases toward searchable keywords
Real-World Example: Receipt Processing
Let's see what happens when a user uploads a receipt image:
| Input | Gemini Vision Output |
|---|---|
| Image: Photo of coffee shop receipt | "This is a receipt from Starbucks dated January 15, 2025. The receipt shows a purchase of a Grande Latte ($5.45) and a Blueberry Scone ($3.95). The total amount is $9.40 paid with a Visa card ending in 1234. The store location is 123 Main St, Seattle WA. Receipt number: 4567-8901." |
What just happened? Gemini Vision didn't just perform OCR—it:
- Identified the business (Starbucks)
- Extracted individual line items with prices
- Recognized payment method details
- Captured the store location
- Structured everything in searchable natural language
Now when the user asks "How much did I spend at Starbucks last month?", our vector search finds this receipt based on semantic similarity!
From Image Description to Vector Storage
After Gemini Vision generates the description, the worker treats it like any other text document:
// Step 4: Chunking (same for text and image descriptions)
const splitter = new RecursiveCharacterTextSplitter({
  chunkSize: 1000,
  chunkOverlap: 200
});

const chunks = await splitter.createDocuments([extractedText]);

// Step 5: Generate embeddings for each chunk
for (const chunk of chunks) {
  const { embedding } = await embed({
    model: google.textEmbeddingModel('text-embedding-004'),
    value: chunk.pageContent
  });

  // Step 6: Store in PostgreSQL (pgvector)
  await prisma.$executeRaw`
    INSERT INTO "Document" (content, embedding, userId, fileId)
    VALUES (${chunk.pageContent}, ${embedding}::vector, ${userId}, ${fileId})
  `;
}Because image descriptions are stored as vectors just like text documents, users can search everything in one query:
- Query: "Show me proof of the laptop purchase"
- Results: PDF invoice + photo of receipt + email confirmation
The system doesn't care whether the source was a PDF, text file, or image—it's all searchable semantic knowledge.
Cost Analysis: Is Gemini Vision Free?
Gemini Vision falls under the same free tier as text models:
- Free Tier: 15 requests/minute, 1,500 requests/day
- Average Processing Time: ~2 seconds per image
- Daily Capacity: ~1,500 images processed for free
For a startup or side project, this is more than enough. Even with 100 active users uploading 5 images/day, you're well within the free tier.
Congratulations! You now understand all 4 phases of a production-grade RAG system. Let's wrap up...
Build vs Buy: Why This Architecture Matters
Commercial RAG solutions like Pinecone ($70/mo), Weaviate ($50/mo), or hosted vector databases charge premium prices for functionality you just learned to build for $0/month.
What You Actually Built (and Most Tutorials Skip)
This isn't a "hello world" RAG tutorial. You implemented production-grade patterns that most companies pay senior engineers $150k+ to build:
The Resume Hack: Prove Senior-Level Skills
If you're a student or job seeker, adding this project to your portfolio signals to hiring managers that you understand:
- Distributed Systems: Async workers, job queues, background processing
- Database Design: Vector databases, indexing strategies, query optimization
- Security Engineering: Multi-tenancy, presigned URLs, row-level security
- AI/ML Integration: Embeddings, semantic search, prompt engineering
- Cloud Architecture: S3-compatible storage, cost optimization (zero egress)
This is the difference between "I built a chatbot" and "I architected a production-grade RAG system with multi-tenant security and multimodal intelligence."
Let's compare our $0/month solution to commercial alternatives:
| Solution | Monthly Cost | Annual Cost |
|---|---|---|
| Our Stack (Free Tier) | $0 | $0 |
| Pinecone (Vector DB) | $70 | $840 |
| AWS S3 (5GB + egress) | $45 | $540 |
| OpenAI API (moderate usage) | $50 | $600 |
| Commercial Total | $165/mo | $1,980/year |
Your Savings: $1,980/year by building instead of buying. That's a MacBook Pro or 6 months of rent.
Next Steps: From Tutorial to Production
Ready to deploy this as a real product? Here's your checklist:
- Environment Setup: Get API keys for Google AI Studio (free) and Cloudflare R2
- Database: Deploy PostgreSQL with pgvector on Render.com or Railway.app (both have free tiers)
- Redis: Use Upstash free tier for BullMQ job queue
- Deploy API: Render.com or Railway.app (both have free tiers)
- Testing: Upload a PDF and image, test the chat interface
- Scale: Monitor usage and upgrade to paid tiers only when you hit limits
Congratulations! You now have the knowledge to build production-grade AI applications. Keep learning, keep building! 🚀
Early Access Launch Special
Get the Production-Ready Node.js Enterprise Template
- ✓ Complete RAG Pipeline (Production-ready AI integration with embeddings)
- ✓ Authentication & RBAC (Secure JWT, Refresh Tokens, Admin/User roles)
- ✓ Cloudflare R2 / S3 Integration (File uploads with zero egress fees)
- ✓ Socket.IO Real-Time Notifications
- ✓ Background Processing (BullMQ Workers for heavy tasks & ingestion)
- ✓ pgvector Setup & Migrations
- ✓ Automated Maintenance (Cron jobs for file cleanup & token management)
- ✓ Full API Documentation (Swagger)
- ✓ Developer Experience (TypeScript, Jest Tests, ESLint, & Prettier)
- ✓ Docker Compose & Railway.toml for instant cloud deployment (No cost)
- ✓ Production-ready deployment (Render.com or Railway.app)
One-time payment, lifetime access
Save 40+ hours of setup, debugging, and deployment. Get production-tested code that just works.